The (Literally) Lean Startup: How to Slim Down While Starting Up

Tl;dr: Use common sense and ignore fads – it all comes down to just diet, exercise, and discipline. Make a plan, stick with it, and you’ll lose weight. See below for specific tips.

When I started my first job out of college, I gained fifteen pounds in about three months. In retrospect it’s obvious why – I carried over my college eating habits into a new environment. The problem? In college, I fenced three hours every day. At work, my biggest exertion was standing up to grab free snacks.

Modern work environments (especially for hackers) are very unhealthy. Sitting for just four hours per day will literally kill you faster, and it’s damn hard to pivot your way out of diabetes or heart disease.

I managed to halt my post-college weight gain through a variety of expensive counter-measures (including the generally-very-expensive Paleo diet), but since sacrificing my income to join startup-land a year ago, I’ve had to give up all those luxuries.

Nevertheless, I’ve lost five pounds and gained a lot of muscle in the last twelve months despite sitting at a desk for an average of fourteen hours a day.

Here’s how I did it.

First, you need to accept that there are no secrets and no magic bullets. Everything on this list will be obvious, and the real trick is to integrate these elements into a plan and stick with it forever. And frankly, if you lack the willpower to set a plan and stick to it you should not be starting a company.

Your weight is ultimately governed by one simple equation:

Change in Weight = (Calories Eaten)/(Quality of Calories) – Calories Burned

That’s it.

Yes, there is a genetic component.  Yes, the more weight you lose the harder it is to lose more and keep it off (I currently weigh 15% less than I did when I was 14 years old). But both of those factors work by reducing the calories you burn.

If you’re fat, it’s because you’re burning fewer calories than you’re consuming. And you can always fix the problem by simply consuming less or burning more.

Specific Tips:

Exercise:

1.     Run. Running burns more calories per minute than nearly any other exercise you can do. Yes, it is painful and hard. That’s the point – the pain you feel is your muscles getting stronger and the exhaustion is your body’s now-maladaptive evolutionary response warning you against expending calories. And anyone can do it with practice – last year I could barely run a mile and a half, now I can run 10+ miles. Also, unless you have a serious prior injury, running is actually good for your knees.

2.     Set a Routine. Follow It. Consistency is crucial. Many days you’re going to feel like hell and want a break. It’s in your head. Your body still needs exercise. My routine is 3.5 miles on the treadmill, 30 Russian twists + 30 crunches + 10 leg lifts, 30 bicept / tricept curls. All together, it only takes about 40 minutes, and I try to do it at least five times a week (you need exercise basically every day for your entire life.) To help stick with the routine, try Pavlovian conditioning – choose a favorite daily activity and only allow yourself to do it after going to the gym (for me, I try to only Reddit after the gym.)

3.     Do a little exercise every time you stand up from your desk. This may be too disruptive in your work place, but if you’re alone do ten squats and fifteen jumping jacks every time you go the bathroom or get a drink. This will get your circulation going and (maybe?) mitigate the deadly effects of sitting all day.

4.     Podcasts in the gym. Exercise can be boring. Make it productive by listening to an excellent entrepreneurial podcast like Stanford’s Entrepreneurial Thought Leaders, This Week In Startups, or Mixergy.  If you run out of podcasts, get a book on tape (e.g. through Audible). Or if your brain needs a rest, catch up on Battlestar Galactica through the Netflix app (which works surprisingly well even on 3G).

5.     Endurance Cardio > Weightlifting. Jackedupius Startupicus Guy is a common sight, and having more muscle does help you burn marginally calories even while sitting. But building too much muscle takes up valuable gym time and can make it harder to run for long distances (which is what really burns the calories.) 

6.    Get Fivefingers.  Yes they look silly and are a bit expensive, but they’re awesome. I used to get blisters from my running shoes (which are equally expensive) after three miles, but I never get blisters from Fivefingers even after running 12 miles. And barefoot running is maybe better for you. Be careful because it takes some adjustment – you need to change your running stride to land on the ball of your foot, and it takes time to build up the calf muscles to avoid hurting your Achilles tendon. Start slow and be patient.

7.     Buy dumbbells. They’re cheap. Keep them by your desk and use them after the gym plus whenever you’re waiting for something. That’s about as much weightlifting as you need.

8.     Cheap Gyms are Fine. Basically all you should be doing at the gym is running on the treadmill and lifting weights. You don’t need to pay $100/month for fancy lighting and classes that are by and large a waste of time. A little dinge won’t kill you.

9.     Keep It Interesting. I like running outside so I created “the Subway Challenge,” where each weekend I take the subway to the end of a line, and run home to Brooklyn. The exploration has been awesome (and probably merits its own post), and being able to run gradually farther distances and make progress towards a big goal is very motivating. You can follow my #SubwayChallenge progress on Twitter (@rogueleaderr)

10. Avoid Protein Shakes. It’s tempting to think you need one to “help recover”, but two scoops of protein can have 400+ calories, i.e. enough to undo around 3 miles of running. Unless you’re bodybuilding, you don’t need more protein.

Diet:

1.     This is What Matters – as much as I wish it were the other way around (because I love eating), diet generally has a much great effect on weight than exercise. Exercise burns disappointingly few calories – even my strenuous routine only burns around 600 calories, which is about the amount in a $2 McDonald’s triple cheeseburger. Cycling / elliptical / lifting etc. burn even fewer.  And food contains a lot of calories (122 in a glass of 2% milk, 216 in a cup of cooked rice). Dropping one glass of milk from your diet has about the same effect as running an entire extra mile.

2.     ~3,500 calories per pound of fat. Loosely speaking, if you want to lose ten pounds you need to burn 35,000 more calories than you eat. You can do that in a year by dropping just 100 calories from your diet each day (e.g. one small bag of chips.) Or you can just run 350 miles.

3.     Quantity is King, but Quality Counts. I have never seen a conclusive scientifically rigorous study showing that diets that restrict types of food but not calories have any real effect. But there are suggestions that some types of calories, specifically carbohydrates (grains, sugars) and foods with a high glycemic index (bread, rice) produce more weight gain per calorie consumed. And some foods (e.g. those high in saturated fat) will just kill you even if they don’t make you fat.

4.     Eat like a Caveman. Paleo works, at least for me. At my last job I spent a year completely avoiding grains, sugar, and dairy and I actually kept my weight flat despite minimal exercise. Ceteris paribus, it’s always better to get your calories from fruits, vegetables, lean meats, olive oil, and nuts. You don’t need to be fanatical about it, but even a shift in relative proportions will make a difference.

5.     Act like a Poor Caveman. The reason I stopped Paleo is that it’s expensive, both in money and time. Fruits, vegetables and meats have the nasty property of rotting when left in the pantry, so you either have to shop frequently (time expensive) or order from restaurants ($ expensive). So… EGGS! They’re super cheap, keep a long time, and it takes 3 minutes fry them.  I eat eggs for breakfast almost every day and my cholesterol is fine (the egg/cholesterol link has been debunked). And…

6.     Buy a crockpot. They’re cheap and awesome. I just bought this one for $20 and I’m loving it. They require extremely minimal prep time for cooking. And they also break down the toughness of cheap meat, making it practical and delicious to be “poor Paleo” by using lots of frozen meats and vegetables (which are much cheaper and non-perishable.) Just throw random meats and vegetables with tomatoes and broth and you have stew. If you want more heft, add quinoa or brown rice for a (relatively less bad) carbo hit.

7.     Fruit Smoothies: If you have a membership to Costco or another wholesaler (see if you can get on your parent’s membership if not), you can get relatively cheap frozen fruit, which never perishes, is full of vitamins, and makes delicious smoothies regardless of the quality or ripeness of the fruit.

8.     Take multivitamins.  Unless you’re paying a lot attention to the balance of your diet, it’s easy to accidentally get a subtle but insidious vitamin deficiency. Generic multivitamins cost around $0.08 per day, and take scurvy off the table. Just do it.

9.     (Bonus) Eat Less on Weekends. Outright dieting isn’t really an option for me because my cognitive capacity drops precipitously with my blood sugar, and I just can’t work when I’m hungry. But when I don’t need to work, it’s not the end of the world if I’m 10% dumber. So I’ve been experimenting with inverting my old “indulge on the weekend” approach and just plain ol’ restricting my caloric intake on weekends. I’ve been able to hold off weight without doing this, but I think it’s helping me break through my current plateau. Obviously don’t starve yourself, and be careful about exercising when you’re hungry.

And that’s all I’ve got for today.

There’s nothing magical here, but all these tips taken together have been enough for me to gradually lose weight and keep it off. If you’re disciplined about it, it should work for you too.

Comment below if you have any other good tips.
Why You Should Always, Always Vote (and arguments to the contrary are totally wrong.)

For a while, I’ve noticed a growing trend (especially among my more liberal friends) to argue either that voting doesn’t matter or even directly against voting.  None of these positions hold water, and today an incredibly erroneous anti-voting blog post by my (usually) very reasonable friend Travis Mushett has convinced me that it’s time to finally put these arguments to bed.

We have two claims to refute:

1)   Electoral margins of victory are always so large that one vote (effectively) never matters.

2)   By not voting, constituents can threaten their candidate into adopting more desirable policies.

These claims may seem rather different but they’re vulnerable to the same counter-argument, which runs as follows:

Voting doesn’t just select a winner in a single election. It is also reliably registers the preferences of the electorate.

Remember that we live in representative republic (not a democracy) wherein the voters select a set of broad goals reflecting their “desired state of the world” and then elect officeholders who they think are most likely to achieve those goals.

Our representatives are highly sensitive to the preferences of the people who elect them (i.e. they represent us). And as such, their policy positions are highly malleable and shift as the preferences of the electoral shift.

How do politicians know which way the winds are blowing? They’re pragmatic enough to know better than to listen to the talking heads on TV or in the blogosphere, who for a variety of reasons almost always advocate more radical positions than the general electorate supports. Instead, they watch the voting data.

When politicians win with large margins, they move toward the median of their party. When they win by narrow margins, they move toward the center. If they don’t move, primary challenges will smell blood in the voting results and knock off the incumbent. The rare politician who fights a pyrrhic battle is quickly replaced.

It’s really that simple.

If you don’t vote, the politicians who do win (and someone always wins) will govern as if you don’t exist. Even if you do vote, they still won’t give much weight to your individual opinion. But given that we live in a nation of 300,000,000-some people, there are 299,999,999 people who’d feel rather cheated if the president started taking your calls. 

If you want more influence, go convince other people to vote for what you want. There is no other way.

Future of the Economy #2(a) – Rich Hypothetical Society, Poor Hypothetical Society

Earlier today, I was on a plane without wifi. Trading one type of cloud for another freed me to continue my gradual explication of our economic future.

Last time, I argued that “the economy” is the total sum of everything useful to human life, and that “prosperity” is the sum of all those resources divided by the number of people enjoying them.

Today, I’ll cover why and how the prosperity of a society changes through time.

We’ll need three more concepts:

1) Production

2) Consumption

3) Wasting (e.g. rotting of fruit)

Tautologically, everything man-made was produced at some point. So:

Total amount of stuff we have (i.e. “Wealth”)

equals

( Natural Resources plus Everything Ever Produced )

minus

( Everything Ever Consumed plus Everything Ever Wasted )

Prosperity changes because of relative changes in the rate of production vs. consumption. Societies get richer when they produce more than they consume, and get poorer when the consume more than they produce. This may seem obvious, but all the crucial parts of macroeconomics spring from this notion.

Why do these rates change? Three reasons:

1) Exogenous

2) Cyclical

3) Secular

Exogenous reasons are usually-random, usually-one-off events like wars or gold strikes. Cleary, being sacked by Mongol hordes makes you poorer, and I won’t cover these types of events here.

Cyclical reasons are what underlie normal recessions and expansions, and (by-and-large) are caused by changes in the amount of money people borrow to consume or invest. When people borrow and buy a lot, we have an expansion. When they borrow less, we get a recession. The most important factor in consumer borrowing is the interest rate (how much do I have to pay tomorrow for the $10,000 car I bought today?) People who can explain exactly what determines the prevailing interest rate tend to spend more time on mega-yachts than in coach class on US Air, but basically: the interest rate is set by the Federal Reserve based on (a much more complicated version of) an equation called “the Taylor Rule”. Cyclical factors get a lot of attention because their effects are easily and immediately noticeable (and crucial to trading financial markets), but ironically, cyclical factors usually matter very little to long-term prosperity (for the same reason that most waves don’t affect the sea level.)

I’ve hit my self-imposed word limit, but next time I’ll discuss secular reasons, which – forgive the pun – are where the money is. 

Try the Semantic Web For Yourself! [Quickstart] guide to setting up your own SPARQL endpoint.

Today I’m going to walk you all the way through configuring a working, publicly accessible SPARQL endpoint.

Our endpoint is going to run on Amazon’s cloud service. We’re going to working in Ubuntu Linux, using Sesame’s native store as our database, and using the DBPedia ontology as our sample dataset.

Because we’re working in the cloud, pretty much any computer should work for this. Personally, I’m using a 2011 Macbook Pro running OSX Lion. I have no idea how well this works on Windows, but as long as you use the cloud it shouldn’t be much different.

These directions should also by and large work on your local machine (especially if you’re running Ubuntu, and if you aren’t you can always create a virtual instance…if you care to figure out how to do that, because I’m not going to explain it here!)

So, here’s what we’re going to do:

1.     Create a server in the cloud

2.     Tweak the server to get it ready

3.     Download and install Sesame and Tomcat

4.     Upload our data

5.     Publicly expose the endpoint

6.     Celebrate

Here we go…

1.    Create a server in the cloud

We’re going to be using Amazon’s cloud services, also known as Amazon Web Services (AWS).  AWS offers a variety of different services, but we’re specifically going to be using their Elastic Compute Cloud (EC2) that lets us create fully functional virtual servers. (“Virtual” just means that our server is an illusion created by software running on Amazon’s servers rather than being an actual physical machine, but for nearly all functional purposes it’s exactly the same).

Amazon has great guides for getting started with AWS, so I’m going to just cover the very minimum you’ll need for this purpose. If you want to actually use your server for anything, you should review the official documentation (and use it or Google to troubleshoot anything that goes wrong.)

So, to get started go to http://aws.amazon.com and either sign in or sign up for a new account.

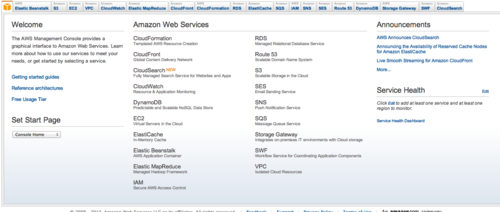
You’ll need a credit card, but everything we’re going to do in this demo will actually be extremely cheap (probably <1$) because most AWS functions are free for light usage.  Once you’ve signed up, you’ll see the AWS Management Console.

Click on the “EC2” tab.

Now click the big button that says “launch instance”. Click “Classic Wizard”, then click “Community AMI”. An AMI is a server image. They let you save the configuration and contents of a server and then create a new one with the press of a few buttons. Amazon provides a few for various configurations of Linux and Windows, and you can find others on various websites (such as for different distributions of Linux).

[In case you’ve never used Linux: Unlike Windows or OSX, Linux is more of a “tree” of many slightly different operating systems that come from a common root.  The different branches of the tree are called “distributions” or “distros”, and there are a lot of them. They each have their own advantages and disadvantages, but overall which one people choose seems to be mostly a matter of taste. Right now, the most popular one seems to be the “Ubuntu” distribution. It’s the one I’m most familiar with, so we’re going to use that.]

You can get a clean image of Ubuntu for EC2 from the Ubuntu website, but “clean image” means that there is virtually nothing installed. I’ve created an Ubuntu image that has a few essential programs installed, plus a program called “NX” that lets us open a graphical interface for our server instead of just controlling it through a command line.

You can find this AMI by typing “ami-f8ce1491” into the search window. Click “select”. Click “continue” three times until you get to the window that lets you enter a name for your server. Enter something memorable, then click continue again. On the next screen, you’ll need to create a “key pair”, which is a set of public and private SSH keys that you’ll use to connect to your server (since passwords aren’t considered secure enough.) Name your key, and download it to somewhere memorable.

On the next screen, click “create a new security group”. Enter a name, and in the add rule box, click select “All TCP” and click “add rule”. NOTE: THIS IS EXTREMELY INSECURE. IF YOU WANT TO ACTUALLY USE THIS FOR PRODUCTION OR STORE ANYTHING REMOTELY SENSITIVE ON YOUR SERVER, YOU’LL NEED TO BE MUCH MORE CAREFUL WITH SECURITY. But that’s time consuming, so we’re not going to worry about it now.

Now click “launch”! Wait a few moments for Amazon to create the instance, and you’ve got a server.

2.    Tweak your server to get it ready

Lets get this server ready. First, let’s make it easy to access by giving it a fixed IP address. From the AWS console, click “Elastic IP’s” in the pane on the left.  Click the “Allocate New Address button on top”, then click “Yes, Allocate”. Now click the “Associate Address” button up top.  Choose the name of the instance you just created, and click “Yes, Allocate”. Now you can reach your server by that IP address (though you will have to re-associate it if you ever shut down your server.)

[Note: if you ever terminate (as opposed to ‘stop’) an EC2 server, it is destroyed and you cannot get it back! So terminate with caution, if at all.]

You can login to your server using the “ssh” program, which creates a secure connection between your local computer and the server. Try it now to make sure it can connect. Open up a command line (using the ‘terminal’ program on a Mac or Linux, or get a program called ‘Cygwin’ on Windows.)

Type in:

myusername$ ssh ubuntu@your.ip.addr.here

[Note: I’ll use ‘myusername$’ to indicate a command prompt. Don’t type that in!]

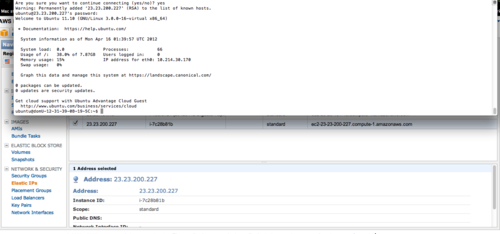
You’ll get a message asking if you want to add the server to your list of accepted hosts. Hit enter.

You’ll be prompted for a password, enter ‘ubuntu’. You should now be connected to your server:


You can do a remarkable amount from this little terminal connection, but life would be easier if we could interact with our server through a graphical user interface (GUI) like we’re used to. Let’s make that happen.

On your local machine, visit http://www.nomachine.com/download.php and download the NX client for your OS. Install it as prompted, then open it up. When the window opens, click “new connection”, then enter the IP address of your server. Click on your new connection, and you should be prompted for a password and username. Enter username “ubuntu” and password “ubuntu". Click “create new connection” and select “Create a new GNOME desktop” (GNOME is a program that creates a GUI interface for a Linux server.)

NX has a bug where sometimes it won’t let you login to a freshly created Amazon instance. If you get a “user authentication” error, you need to remove and reinstall NX. So go back to your command line and type:

myusername$ sudo apt-get remove nxclient

(hit yes)

myusername$ cd ~/Downloads

myusername$ sudo dpkg –I nxclient (hit tab to autocomplete)

myusername$ sudo dpkg –I nxnode (hit tab to autocomplete)

myusername$ sudo dpkg –I nxserver (hit tab to autocomplete)

One more little irritation…Ubuntu apparently does not come with Java installed. A very large percentage of Semantic Web tools are written in Java, so we’re going to need that. To grab it, simply enter:

myusername$ install java sudo apt-get install openjdk-6-jdk

Now we’ve got a nice clean remote desktop.

3.    Download and Install Sesame and Tomcat

Now that we’ve got a basic environment set up, we can start installing our actual Semantic web tools!

A quick rundown of what we’re going to use:

Sesame is a substantial package of libraries (i.e. reusable chunks of code) that provide a variety of useful functionality for working with Semantic data. Sesame provides a parser (Rio) that can read strings and interpret them as RDF, a SAIL (a.k.a “storage and inference layer”) which is an API (application programming interface, i.e. a set of standardized functions that can be integrated into other programs), a built in “Native” Triple Store (a database for RDF), a webapp (“Sesame HTTP Server”) that lets you control a Triple Store directly from a webpage and also handle simple HTTP requests, and some other stuff as well.

Sesame is modularized, so you can use as many or as few of these libraries as you want. In this demo, we’re going to focus on the web app (which bundles along most of the other lower-level functionality). To get it, go to http://www.openrdf.org/download_sesame2.jsp, follow the links to the download page, and download the latest version (2.6.5 as of this writing) onto your EC2 server (I’m assuming you’re using NX and so you can do this from Firefox, but you can also find the exact link on your local web browser and download via command line using the “wget” utility.)

In order to use the webapp, we need a server that can actually communicate with the outside world and forward web requests along to Sesame. The two main options for this are the Tomcat Server and the Jetty server. They’re very similar (from what I can tell), but we’re going to use Tomcat because it seems a bit slicker and better supported (it’s an Apache project.)

You can download Tomcat from http://tomcat.apache.org/download-70.cgi Choose an appropriate mirror, and download the tar.gz file under “Core:”

Open a terminal (hit the Windows or Command key and type “Terminal”), open the folder you’ve downloaded into (/home/ubuntu/Downloads unless you’ve changed something), and “unpack” tomcat by typing:

myusername$ tar -xvf apache-tomcat-7.0.27.tar.gz

[Note: the “.gz” suffix stands for “gzip”, which is a Unix compression utility basically similar to WinZip, and “.tar” stands for “tarball”, which is a file format that compresses a bunch of files into a single file.]

Now you can run Tomcat directly from your downloads folder, but that’s a bit sloppy. Let’s put it somewhere more normal:

myusername$ sudo mv apache-tomcat-7.0.27 /var/local/

Now you can find your Tomcat server by going into the /var/local/ directory.

Let’s start Tomcat to make sure it works:

myusername$ /var/local/apache-tomcat-7.0.27/bin/startup.sh

You should see this:

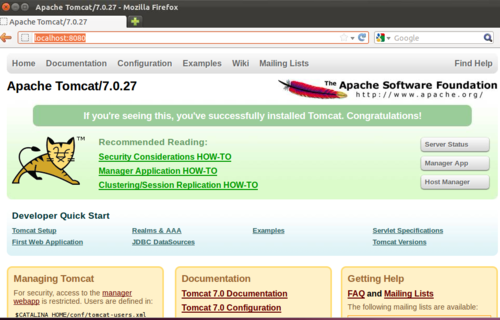
Test that it’s working by opening up Firefox (through NX) and visiting http://localhost:8080 and you should see:

[Note: When one computer talks to another through “TCP” (transmission control protocol), it does so by transmitting data through “ports” which are like “lines” on a telephone. You have 65535 ports on your computer, and the :8080 means that you are communicating with the Tomcat server through Port 8080]

Let’s shut the server down and go Sesame.

First:

myusername$ /var/local/apache-tomcat-7.0.27/bin/shutdown.sh

Now, we have to put Sesame somewhere that Tomcat can find it. Web apps are contained in .war files, and we’re going to find the Sesame .war and copy it into the “webapps” subdirectory of the Tomcat directory:

myusername$ cp ~/Downloads/openrdf-sesame-2.6.5/war/* /var/local/apache-tomcat-7.0.27/webapps/

This will move two files: openrdf-sesame.war and openrdf-workbench.war. The first provides just the basic Sesame functionality without the web-based dashboard. The second gives you the dashboard, which is very useful for simple work.

That should be all you need to do to get the dashboard working. To test, let’s startup the Tomcat server again:

myusername$ /var/local/apache-tomcat-7.0.27/bin/startup.sh

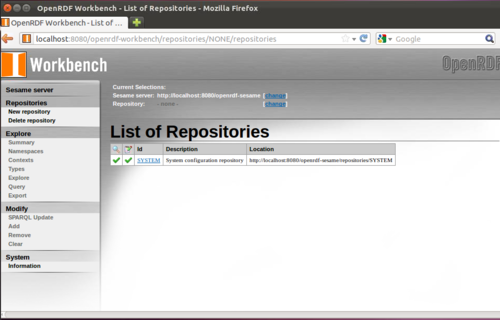
Now inside of Firefox, navigate to http://localhost:8080/openrdf-workbench.war You should see:

4.    Upload our data

There are a number of tweaks that you can make to Sesame and Tomcat to make them work better for your particular purpose, but the configuration we have right now is good enough for basic tasks. So let’s start uploading some data right away!

We’re going to use a sample dataset taken form the UK government’s foray into Open / Linked Data, www.data.gov.uk.

We’re going to use the “finance-statistics” dataset which contains summary information about British public expenditures.

Download the dataset here: http://source.data.gov.uk/data/finance/finance/2009-09-30/finance-statistics.zip

From the command line, navigate to the folder and unzip the file:

myusername$ ~/Downloads

myusername$ unzip finance-statistics.zip

Now, head back to the Sesame webpage (http://localhost:8080/openrdf-workbench). In Sesame, data is stored inside of “Repositories” (think individual filing cabinets), so the first thing we need to do is create a new repository.

From the first page, click “new repository” from the Nav Bar on the left.

Sesame has a number of different types of repositories tuned for different purposes. The simplest is the “in memory” store that is optimized for smaller amounts of data that can all fit…in memory. (Don’t worry – the data is saved on disk and can be reopened later after you shut down the server.) If you want to load a large amount of data, try the “Native Java” store. And if you want to do serious heavy-duty work, consider one of the other commercial Triple Stores like OWLIM or Bigdata that uses the Sesame SAIL but replaces the native repositories.

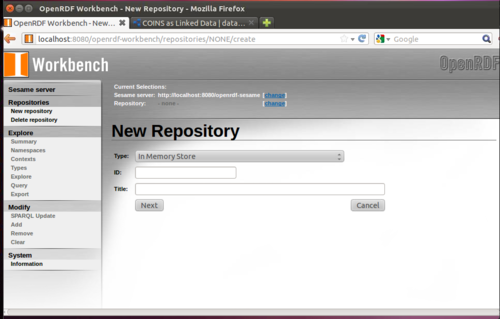
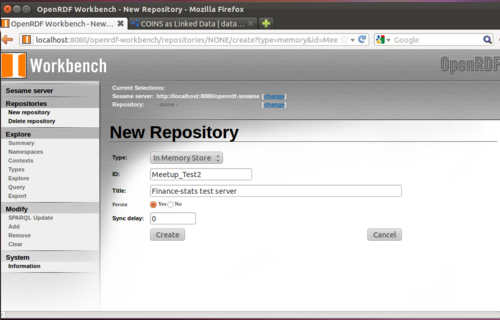
We’re staying small, so the In Memory store will be fine for us. Give your repository a name and description and click next.

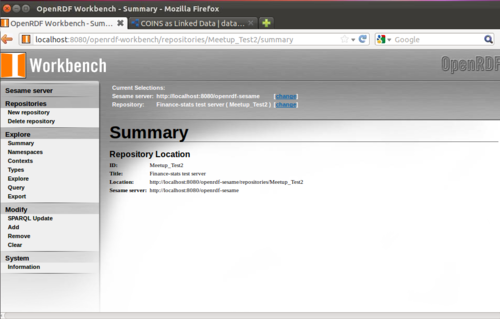
Leave everything on the next page the same and click “create”. You’ve got a repository!

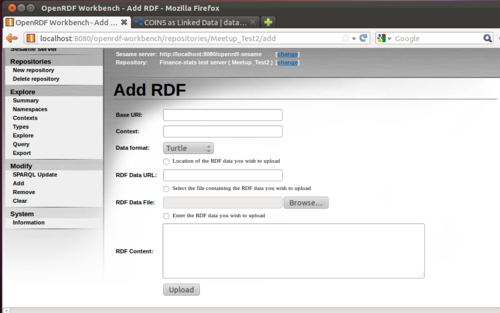
Now, to add some data, click “Add” on the nav bar.

Under “base uri” enter http://www.data.gov.uk (Sesame uses this to track where data came from), and leave “context” blank. The file we’re uploading is in the RDF/XML format (i.e., it’s pretty much in XML), so select RDF/XML as Data Format. Click “browse” and locate wherever the unzipped finance-statics.rdf file is.

Now, click upload.

This dataset is small, so it should upload almost immediately.

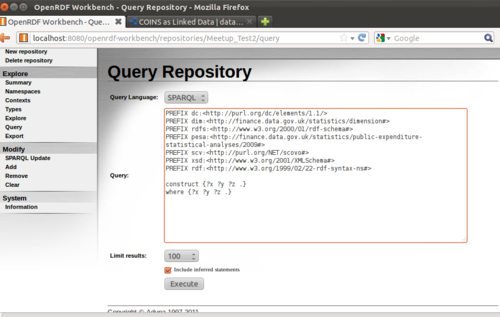
Let’s run some queries. Click “query” on the left.

Enter a simple “CONSTRUCT” query that will return 100 random triples.

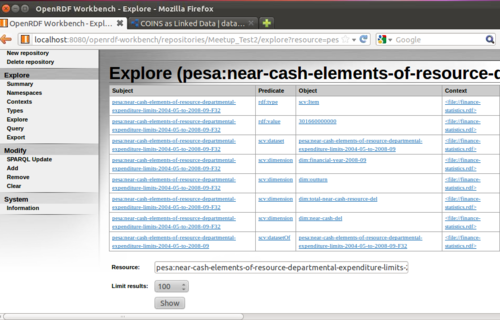
You can now click the blue links to get all the triples that each link is the subject of.

Cool, huh? You can find much more detailed instructions about everything else Sesame can do on the openrdf website.

5.    Make it public!

The big advantage of using EC2 is that it’s super easy to turn this into a true public endpoint. If you gave the server an elastic IP earlier and set the security to completely open, it should be possible to access it right now.

From your local machine, just visit http://your.ip.adr.here:8080/openrdf-workbench

Tada!

6.    Celebrate

That’s it. You’re done! Only with this little exercise of

Next…there is a vast, vast world of Semantic Tools and Semantic data that you can learn to help you accomplish nearly any data-related task.

The natural next jumping off place would be to learn how to use the Sesame API directly from Java so that you can build big and exciting semantic applications. Or you can learn how to use the REST paradigm to send SPARQL queries to your fancy new public endpoint from inside of other programs you write (or even from a website built with Python/Django). Or you can learn how to use a more powerful Triple Store to handle huge amounts of data (Sesame’s native stores only work up to around ~100 million triples).

It’s a big world. Go forth and enjoy.

Setup a (basic) publicly accessible website in an hour with Django and Pinax

This guide should be enough to get you up and running with a (bare-bones) functional, publicly accessible website in just a few hours. 

We’re going to accomplish this using Pinax, an open-source project that aims to “deal automatically with what most websites have in common, and let you focus on what makes your site unique.”

Pinax is made up of several components. The core is a tool that generates new Django projects, configures them to work out of the box, and installs some “django apps” which provide basic essential website functionality. (As you hopefully remember, Django is designed to work with modular apps that let you easily package and install reusable bits of functionality.) In addition to the core apps, Pinax also provides a number of additional apps you can install that provide extra bits of functionality like managing user accounts or enabling basic social networking. Finally, Pinax provides starter projects that provide “out of the box” websites with various configurations of apps pre-installed.

So at a very high level, the steps we’re going to go through are:

1)   Set your system up to use Pinax

2)   Choose a starter project that suits your needs

3)   Use Pinax to generate the project

4)   Install any other apps you want

5)   Customize your website!

6)   Put it all online

I’ll walk you through the whole process step-by-step

1: Set your system up to use Pinax

Start by following the basic setup directions from the Pinax Documentation here.

 In short:

1.     Create and activate a virtual environment (which helps you make sure that you’re using the right versions of the right packages for your project, without worrying about accidentally upgrading a package a different project depends on.)

2.     Install Pinax inside your virtual environment (`pip install Pinax`)

The official documentation for this step is good, so follow it for more detail.

2: Choose a starter project

The starter project you choose will serve as the foundation of your website. You can either start with the extreme barebones and install all the apps you want one-by-one, or you can The next step is to pick a “starter project” to use as the foundation of your project. 

Most Pinax starter projects fit into three categories:

Foundational projects are intended to be the starting point for real projects. They provide the ground-work for you to build on with your domain-specific apps. Examples of foundational projects are zero_project and account_project.

Demo projects are really just intended to showcase particular functionality and demonstrate how a particular app works or how a set of apps might work together. You probably wouldn’t use them to kick off your projects (other than to get ideas) and they aren’t intended to be used for real sites.

Out-of-the-box projects are intended to be useful for real sites with only minor customization. That is not to say they couldn’t be highly modified, but they don’t need to be, beyond things like restyling.

Currently, Pinax only officially provides four foundational projects for you to use, though the developers intend to add some Out-of-the-box projects soon. You can also find some old starter projects in the old Github repo, but these are no longer supported and may have broken dependencies, so use at your own risk.

To see a full list of the officially supported startup projects, type

`pinax-admin setup_project –l`

See here for more details on the official starter projects.

In this guide, I’m going to use a partially configured project “account” that includes the most essential infrastructure apps plus basic user registration. Right now, setting up accounts if you start with the “zero” project is a little tricky (though the developers are planning on fixing that very soon.) From there, I’ll then walk you through the whole process of getting from zero to hero.

3: Use Pinax to generate the project

So, create a new directory where you want your project to live (this nested structure will make it easier to deploy your website in step 6). Cd into that directory, and from there (and with your virtual environment activated), type

`(mysite-env)$ pinax-admin setup_project -b account mysite `

Your system should create a new subdirectory and install the required packages. Now you’ve got a working Django project. Get it started by running

`(mysite-env)$ cd mysite`

`(mysite-env)$ python manage.py syncdb `

`(mysite-env)$ python manage.py runserver `

syncdb will create a SQLite database named dev.db in your current directory. We’ve configured your project to do this, but you can change this simply by modifying settings.py where DATABASES dictionary is constructed. You can find more information about this at the get your database running Django documentation.

runserver runs an embedded webserver to test your site with. By default it will run on http://localhost:8000. This is configurable and more information can be found on runserver in Django documentation.

Go ahead and create a git repo now:

`(mysite-env)$ git init`

`(mysite-env)$ git add .`

`(mysite-env)$ git commit –m “initial commit”`

So now you’ve got a website! Check it out and smile.

4: Install whatever apps you want

Your new website is pretty (because it uses Twitter Bootstrap open-source styling), and has some solid core functions (users can register, change passwords, etc.) But you’re going to want more than that.

To add functionality, we add prepackaged Django apps (or write our own). You can find an extensive directory of apps designed to work with Pinax here. I’ll walk you through installing some apps to get a site with some actual functionality.

If you’re not super familiar with Django, the process of installing and using Pinax apps can seem a bit mysterious. The key thing to remember is that apps are just bundles of code (and sometimes templates) that extend the core codebase of your project. Let’s walk through an example and see how everything works.

Let’s start with the “idios” app, which adds profile functionality to Pinax. You can find detailed installation instructions here, but I’ll repeat the basics.

1.     In most cases, you’ll be able to simply type `pip install this_app` (from within your virtual environment, of course!). But for some of the apps that don’t yet have stable releases, pip won’t work automatically. The way that Pinax handles required packages is to put a /requirements directory inside of your project folder which has two files, “base.txt” and “requirements.txt”. Base.txt contains the default packages that were installed with your starter project, plus extra URL’s that tell pip where to look for packages that aren’t in the standard Python Package Index. If you used Pinax-admin to create your project, your base.txt file should already have an extra URL for Pinax apps that are still under development. The other file, project.txt, lets you specify other packages that your project needs. So to install idios:

a.     Open myproject/requirements/project.txt

b.     Add the line “idios”  (In the future, the Pinax developers are planning on providing a list of the latest versions of the different apps so that you can specify which version to use and avoid accidental incompatible upgrades. But that’s not available yet, so just add the name without a version and pip will automatically grab the latest version)

c.      In the terminal (with your venv activated), typed `pip install –r requirements.txt`

d.     Idios (and any other packages you’ve specified but not downloaded yet) should install themselves

2.     Now that we have the package, we need to make Django use it. So open the settings.py file in your project and in the ‘installed apps’ list add:

INSTALLED_APPS = [   

            …

# external

     "idios", ]

3.     Hook up idios to your urlconf file (urls.py)

urlpatterns = patterns(“”,

#          …

url(r”^profiles/”, include(“idios.urls”))

            )

So what actually just happened? You’ll notice that no new files were actually added to your project directory, so where is the extra functionality coming from and how do you use it?

They key is to remember how Python goes about finding code ot use in the first place. When you reference a function in Python, it will sequentially tick down your PATH variable (i.e. the list of places where code packages are included) looking for appropriate bits of code to use. So if you have an actual app folder inside of your project (e.g. if you created your own Django app in this project), Python will look for the code there. If not, and if you’ve included a package name in your “installed apps” list in Settings.py, it will look inside your site packages directory (which will be inside of the virtual environment you created for this project.)

As a shortcut, you can find that directory by typing `cdsitepackages` in the terminal. Do an `ls` inside this folder and you’ll see all the packages you have installed. Note that ‘idios’ is in this list and cd into the directory. This is where all the code for the idios app lives. Unfortunately, most of the current Pinax apps are not extensive documented, so you’ll by and large have to figure out how they work by reading the code.

Take a look at the idios/urls.py folder. Remember above how our urlconf said “url(r”^profiles/”, include(“idios.urls”))” The include means urls your project received that contain ‘profiles’ are being syndicated out to the urls.py file inside the idios package. The urlconf there references functions in the idios/views.py file.

If you want to modify the functionality of an app, you should copy the entire folder into your apps directory of your project, which will put it higher in your path than the site-packages version. That will let you change the code while still keeping your environment reproducible.

5: Customize your site

Awesome. By now, you should have a functional website that allows user registration. You can even got straight to deployment and make this site publicly accessible as is (see Step 6). But you probably don’t want your site covered in filler text and “example.com”. So let’s start making this site your own.

First, let’s change the names that appear throughout the site. Open the file mysite/fixtures/initial_data.json, and change ‘name’ and ‘domain’ to whatever is appropriate. Then in the terminal, run `python manage.py syncdb` to update everything.

Now a word about the Pinax template structure. By default, your project folder will have a templates folder which contains a few basic templates. Most of these inherit from “banner_base.html” or “theme_base.html” which are located inside “Pinax_theme_bootstrap” app which is inside of the site-packages section of your virtual environment.

In Django, the template processors work much like the app PATH; your settings.py file has a template loaders section that looks like this

` # List of callables that know how to import templates from various sources.

TEMPLATE_LOADERS = [

    “django.template.loaders.filesystem.load_template_source”,

    “django.template.loaders.app_directories.load_template_source”,

]`

This tells Django that it should first check for templates inside your project folder, then should look inside the apps you have installed. In Pinax, the bootstrap theme is packaged as an app, so the template loader knows to look for templates that get referenced inside of the apps folder. Remember that you can find the source code for your installed apps by typing `cdsitepackages`.

Several of the other installed apps like ‘account’ reference templates that are also held inside of the bootstrap theme.

If you want to modify any of these templates (which you probably will to some extent as you personalize your site), just copy the relevant templates from the bootstrap folder into the templates directory in your project folder. If the templates are inside of folders (e.g. /account/signup.html), make sure that you keep them inside of folders inside of your templates directory.

Let’s try giving ourselves a custom 404 page.

1.     cdsitepackages

2.     cd pinax_theme_bootstrap/templates

3.     cp 404.html  mysite/templates/

4.     emacs 404.html

5.     add something crazy

6.     open settings.py and change the DEBUG flag to False

7.     Load up a broken page, and see your glorious new error

Using these pretty simple customization processes, you should be able to build yourself a full production website. Remember to aim for modularity, and if you build anything useful, consider contributing it back into Pinax!

6: Deploy your app on the web

Pinax is produced by the guys at Eldarion. They also produce Gondor.io, a platform-as-a-service solution that allows you to automatically deploy Django websites to production. So naturally, using Gondor.io is the fastest way to get your Pinax-based website online and publicly accessible.

To use Gondor.io, just head over to their website and sign up for an account. Then follow the directions to configure your website to use Pinax.

At the time of writing, those directions are clear and accurate, with two exceptions

1.     ignore the instruction about changing the WSGI entry in your .gondor/config file (which will be clear as you follow the instructions.)

2.     In your .gondor/config file, edit the line `staticfiles = false` to say `staticfiles = true`

Do all of that, type `git push primary master`, and you’ve got a live website. Surf over to dyn.com/dns (or your favorite dynamic DNS provider) and set up a dynamic DNS entry to make your personal domain point to your shiny new website.

Congratulations. You’ve got a fully functional publicly accessible website!