[Warning: This is another super-technical post. If you don’t know what the Semantic Web and RDF are, this will be incomprehensible.]
In my last post, I talked about my attempt, as a novice programmer currently capable of only rudimentary Python and not much else, to use Neo4j as an RDF triple store so that I could work with the DBpedia dataset on my laptop. Tinkerpop is an open-source set of tools that lets you magically convert Neo4j into a fully functional triplestore.
My conclusion from that attempt was that using only Python to set up and control Neo4j for RDF is basically impossible.
To reiterate why I’m doing this in the first place: the DBPedia dataset is fascinating and I want to explore it. But the web interface has frustrating limitations (especially the fact that it will simply time out for non-trivial SPARQL queries, and also that I can’t easily download the input to feed into other programs.) So, I want to host the data locally so that I can let my laptop chug away for as long as I damn please answering my queries.
I’m still determined to accomplish that goal, so my new plan is to just bite the bullet and teach myself “just enough Java” (JeJ. Palindr-acronym!) to make this all work. I’ve hesitated to learn Java, since it is, well…extremely daunting.
As of six months ago, I knew basically nothing about programming. Since then, I’ve taught myself rudimentary Ruby (+ Rails) and rudimentary Python (+ Django), both of which are very nice, syntactically simple languages with excellent online “getting-started” resources. For Ruby, I recommend The Little Book of Ruby, or if you’re in for a more psychedelic experience, The Poignant Guide to Ruby. For Rails, I used Michael Hartl’s online Ruby Tutorial (there’s a link to a free HTML version buried on that page somewhere.) For Python, you can’t go wrong with Learn Python the Hard Way. MIT’s Open Courseware Site also has an entire intro to CS class in Python. For Django, I’m working my way through the Django Book. Both languages also have strong, enthusiastic communities in New York which you can easily connect with in person through www.meetup.com. If I get a chance, I’ll write another post sharing all the cool resources I’ve found from trying to learn Ruby and Python.
Now for Java, on all of those points…not so much.
From my perspective as an outsider and a novice, the Java ecosystem looks huge, fragmented, confusing, and uninviting.
Now I will freely concede that I don’t know shit about Java (that’s why I’m trying to learn!), so many of things I say in this post may be deeply ignorant and wrong. If so, please point out any errors/idiocy to me and I’ll happily correct myself.
In this post, I’m going to try to walk you through the whole process of going
FROM: Knowing nothing but a simple scripting language like Python
TO: Knowing enough Java to set up and run a publicly accesible Neo4j server that uses Tinkerpop to process and serve RDF data.
I’m going to try to stick as few steps as possible so that you can follow along even if you’re a true beginner like me. I am going to have to presume that you know enough about the Semantic Web to know what RDF and SPARQL are and why you’d want to use them. If you don’t, that’s just too big a subject to tackle here, though I will try to eventually write an introductory blog post about those too. In the meantime, you can start with wikipedia for a brief overview of RDF and SPARQL, or learn the hard way by reading the W3C specifications for RDF and SPARQL.
So:
STEP 1: Make sure you have Java.
This post presumes that you’re using a Mac. Speaking as a long-time Mac-avoider who just recently ditched his Windows laptop for a new Macbook – if you’re using Windows and want to develop modern software, you need to get a Mac. Just do it.
(Protip: buy used. I got a five-day old Macbook Pro for $2k on Craigslist. It actually had a faulty battery, so the Apple Store gave me a brand new one, no questions asked. Ebay also has substantial markdowns. And if AppleCare is not included, SquareTrade warranties are apparently 90% as good for 50% of the cost.)
So, the basic way that Java works is:
1) You write some code, and save it in a .java file.
2) You compile your source code into .class files, which I presume are in byte-code.
3) A magical machine called “the Java Virtual Machine” magically translates your bytecode into binary which can be executed on whatever system you’re using. The JVM is what makes Java portable to so many different systems…you only have to write code that’s compatible with the JVM, which is the same on every system. Making the JVM compatible with the chipset in your refrigerator is someone else’s job.
So, from what I can tell, “having Java” on your computer means two different things:
1) You have “the Java Runtime Environment”, or “JRE”, which contains the JVM and lets your computer execute precompiled Java code.
2) You have “the Java Development Kit”, or JDK, which contains all the machinery to compile your raw Java source code into bytecode.
Some blogs are claiming that Apple has stopped shipping a JDK since Lion, though you probably have a JRE. I can’t honestly remember what was installed on my laptop when I got it, but to figure out what you have vs. need, just open a console and type:
% java -version
If you don’t have a JDK, you will apparently get explicit instructions on how to get one from Apple. (Oracle apparently just doesn’t feel like supporting Mac). You can also download the latest JDK and updates from the Apple Developer download site. I can’t find a static link but it should hopefully be obvious what to click. This stackoverflow post also has instructions. The latest version seems to be JDK6, though there seems to possibly be a version 7 on the near horizon.
STEP 2: Get Eclipse
Unlike Python, which is happy to run your hello_world.py script by itself in some random folder, Java has fairly rigid requirements for how the filesystem of your project has to be laid out. So while you probably could do everything in emacs, you can save yourself a lot of pain by using an IDE.
One of the most widely-used open source IDE is called Eclipse. In addition to being free, it has a plugin system that makes it (reasonably) easy to add in new functionality. Neo4j will ask us to install some plugins, so I recommend that you just use Eclipse for you development, unless you have a strong reason not to. You can download it here. Just unzip it and put the decompressed folder in whatever folder you want to keep your Java stuff in (for me it’s /Users/rogueleaderr/Programming/Java).
For some reason the drag-the-app-icon-into-your-applications-folder-to-install-on-Lion didn’t work for me (the app wouldn’t launch), but I was able to just put an alias to the app icon into the applications folder and thus add Eclipse to the launch dock.
STEP 3: Get Maven
Don’t you love how simple adding new packages in Ruby is? Isn’t “gem install cthulu-mod” easy and intuitive? Well, forget about that.
You’re going to be using Maven now. I’m still figuring out exactly what Maven does, but my understanding is that it’s a package manager on steroids. If you have Maven installed, you put an xml file “pom.xml” inside each Java project you do, and it specifies the complete structure and all dependencies of your project. So if you download someone else’s project, you can use Maven to automatically make sure that you have everything you’re going to need to run that project. I recommend scanning the wiki page for a quick overview of what Maven does.
To me, typing in “gem install XYZ” three times sounds easier, but hey…
You can download Maven from the Apache website here. Follow the directions on that page to install on Mac. Basically, decompress the file then put it where Apache tells you to, then add it to your shell path. (To add to your shell path, open your .bashrc or .zshrc file, which is a hidden file located inside your home directory “ ~/ ”. If this file doesn’t exist, just create it by typing “ % emacs .zshrc ” (or whatever your preferred text editor is). Then paste in the lines from the Apache install directions. Make sure you enter the right file locations, as I learned the hard way.)
STEP 4: Get Neo4j
As you hopefully know if you’ve read this far, Neo4j is a graph database. While I’ve been told that a graph database is theoretically formally equivalent to a relational database and can be used for almost all of the same things, graph databases are naturally particularly good at representing graph structures. RDF data naturally forms a graph structure, meaning that Neo4j is naturally pretty well suited for hosting RDF.
Neo4j is not as naturally well suited for RDF as a dedicated triplestore like Sesame or OWLIM. But it has one key advantage, which is why I’m testing it out in the first place:
The free open source version is apparently capable of working with billions of triples. Sesame works fine with up to ~100m triples, but even the pared down DBPedia dataset I’m trying to work with has around 1.5bln. My first attempt to “damn the torpedoes” and load everything into Sesame lead to some bizarre behavior. There are commerical solutions like OpenLink Virtuoso and Ontotext OWLIM which claim to work with 10bln+ triples, but those are rather expensive.
Hence, Neo4j gets my attention for now.
Neo4j comes in two forms:
1) A standalone server which you can get by clicking the download button on the Neo4j homepage. The upside of the standalone sever is that you can control it through REST. So if you want to stick with Python, this is probably the way to go. Neo4j does have some embedded Python bindings, but they’re fairly limited. The downside of the standalone sever is that, as far as I know, there is no way to use additional plugins like Tinkerpop, so you’re limited to what Neo4j can do out of the box.
2) A set of Java libraries. This is what we’re going to need, so that we get the full range of control and so that we can use Tinkerpop. Neo4j has a fairly extensive manual which explains how to get these libraries (the specific page is here.) Follow the directions there (including potentially installing an Eclipse plugin called M2Eclipse to let you use Maven directly inside of Eclipse. On my Eclipse install, M2E was already installed, but I’m not sure how to check the full plugin list (Eclipse is pretty freakin’ complicated). But if you open Eclipse–>Preferences and see a line for “Maven”, you’re probably good.
STEP 5: Learn Java
And this is where the paved roads end. From here on out, we’re going to be tying everything together directly in Java, and fighting bugs and dinosaurs as they attack.
User-friendly resources for learning Java seem to be rather scarce (please let me know if you find any.) My solution pro tems is to just go directly to the Oracle Java Tutorial and work through it. Obviously this leaves you about 3652 days short of the ten years you’re going to need to be any good at Java. But assuming you already know the basics of some object oriented programming language, it will give you just barely enough to muddle your way through getting this basic setup working. And crucially, it will teach you how the Java package system works, which is not particularly intuitive but will be crucial if we want to use Tinkerpop.
STEP 6: Get Tinkerpop
Well, I hope you enjoyed learning Java. That must have taken a while. You did go learn Java, right?
Well, just in case you didn’t – I’ll walk you through how to create a Neo4j interface using Tinkerpop. Most of this is ripped directly off of a recent blog post by Davy Suvee, found here. Davy provides some very helpful code, but he assumes a high level of Java fluency. I, on the other hand, will assume that you know no more than I do (i.e. nothing.)
So, start by reading Davy’s post. If you can follow and implement that, you don’t need me!
If not, then let’s start by downloading Davy’s code. Head over to the Github repository. If you don’t know how to use Github, Google yourself a tutorial…it’s pretty easy.
Now, within Eclipse, go to File –> Import. A dialog will pop up. Click Git –> Project From Git

Now click Next. Then copy in the URL of Davy’s project – https://github.com/datablend/neo4j-sail-test.git – last I checked. Now click “
clone.”

Make sure url is autopopulated in the next window, and click next again. You shouldn’t need to enter any github credentials to do this, but if you get an error, try entering yours (definitely worth signing up for a free account if you don’t have one.)

Just click next on the next screen:

And on the last screen, make sure you’re creating the repo where you want it. Then click finish. The repo should download. Eclipse will bring up the original import screen again, but just close it.

Now you have the files! But what to do with them?
For some reason, Eclipse does not let you open projects. ಠ_ಠ
So what you have to do is:
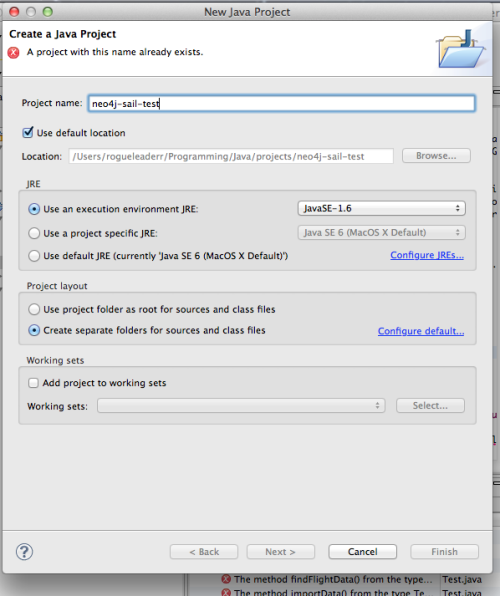
1. Create a new Java project. Make sure your Eclipse workspace is set to the same folder where you cloned the project off of Github (go to File – > Switch Workspace if it’s not). Give the new project the same name as the github repo you cloned. Click okay, and Eclipse should automatically open the neo4j-sail-test project.
2. Now you should have a project open in Eclipse, and you can get started trying to fix all the dependency errors and make this code run.
3. To do that, we’re going to have to get the actual Tinkerpop libraries, and add them to our “classpath”, which is what Java uses to figure out where to look for the files you tell it to import.
That’s hard. And I will try to figure that out tomorrow…stay tuned for part 2.