Another day, another reserve of patience to deal with trying to make this configuration work.
This is part 2 in my series of blog posts about how to get Neo4j with Tinkerpop running as an RDF triple store, assuming that you start not knowing/using Java.
When we left last-time, we had just downloaded the project source-code from a recent blog post by Davy Suvee (see my last post for the link). We opened it in Eclipse, and noticed that there are, like, 2000 broken dependency errors.
After a couple of hours of face-palming, I finally figured out what was going wrong and fixed it. Which brings us to…
STEP 7: Understand how Eclipse and Maven work together.
So you know in Ruby, you type ` gem install unicorn_magic `, some stuff downloads, and from then on your Ruby scripts just have to include ` require unicorn_magic `, and everything just works? Well, when you install a gem in Ruby, it downloads it into some magic folder (I’m not exactly sure where, but unless you care about which version of a gem you’re using, it doesn’t really matter since the programmer is well abstracted from the guts of the language), and from then on, the Ruby interpreter is smart enough to see ` require unicorn_magic ` and think “I should go look in my special magical jewel box for unicorn_magic, and then automatically make it available to my programmer friend so that he can live in the land of smiles and rainbows."
Java doesn’t do that. Java does not care about rainbows and smiles.
Instead, Java has "the classpath”. I’m probably butchering this concept, but as far as I understand it, individual Java projects have to explicitly tell the compiler where to go look for any external packages of code they want to include. They do that by specifying a classpath, which is a set of file-paths that Java will scan through to see if it can find the packages you specified.
So if you want to include packages (like, for example, the entire Tinkerpop framework), you have two options:
1) You download individual .jar files (i.e. “java archive” files, which contain compressed bundles of classes, which, remember, all Java code has to be contained within. For some reason.), and then you tell your project where to find those jars. To do that in Eclipse, you right click on your project, click Build Path –> Configure Build Path –> Add External Jars, then add packages one by one.
Fortunately, we won’t have to do that, because we can:
2) Use Maven. So Maven does a lot of stuff, but for our purpose here, it’s most important function is automatically managing dependencies.
The basic way that Maven works is by inserting a “pom.xml” (i.e. “Project Object Model”, since everything in Java is an object!) into your project. This xml file specifies the exact configuration of your project, most crucially all of the dependencies.
So if we take a look at the neo4j-sail-test project we have open in eclipse from the last post, and double click on pom.xml, eclipse will pop open a set of windows that walk you through the file. Let’s skip those and look directly at the xml, by clicking the “pom.xml” box on the bottom edge of the main sub-window.

Here you’ll see a bunch of <dependency> blocks that specify all the external packages this project is dependent on.
When you’re out on the internets, especially on github trying to pick up an open source tool to use, you’ll often see blocks that look like this:
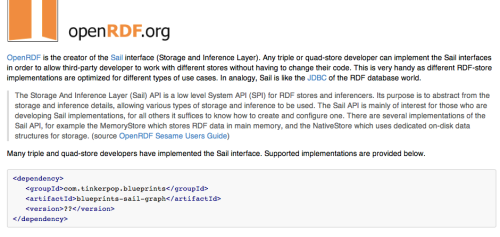
That chunk of XML is a Maven dependency. So if you wanted to use this Sail Ouplemntation pictured above, you would just need to add this xml chunk into your pom.xml file, inside of the <dependencies></dependencies> tags.
Of course, it’s not quite that easy. You still have to tell Maven to actually go get those files so that your project can use them.
To do that, you command-line into your project’s main folder and type:
% mvn clean install
If you have Maven installed correctly (see details in the last post if not), you should see a big rush of text, which will end with something looking like this:

What Maven is (basically) actually doing here is reading through your XML, looking at all the packages you said you needed, finding them in a centralized online repository, and then copying them into a folder on your hard-drive.
By default, that folder is located at
~/.m2
(The “.” in front of a name in OSX means the file/folder is hidden, and won’t be visible in the Finder by default. You can override the finder settings to show hidden folders (Google to see how), but it does lead to a lot of visual clutter. You can also just command-line your way into any hidden folder.)
Now for the somewhat tricky part…
Remember that we confirmed early that Eclipse has a plugin called M2Eclipse, i.e. Maven for Eclipse. That plugin is supposed to tell Eclipse to automatically add the .m2 repository to your classpath, so that projects can automatically find the packages they depend on there.
But for me, Eclipse was not looking inside that folder, which is why I was getting all those dependency errors. You need to make sure Eclipse knows where to look. Inside your Preferences menu, you should be able to find this window (Java–>Build Path–>Classpath Variables), which should have the line you see at the bottom here, “M2_Repo” etc…

If that line isn’t there, or if it is and you’re still getting dependency errors, you need to figure out how make this work correctly. For me, the solution was to go the command line and type:
% mvn eclipse:clean
then
% mvn eclipse:eclipse
That seems to have resolved it, though I’m not actually sure why. If this doesn’t work for you, let me know and I’ll see if I can help.
Okay…getting close! Just one more irritating tweak.
STEP 8: Fix the memory allocation
So Java has built in limits of how much memory running processes are allowed to use. If you’re doing anything large scale with the semantic web, you will often hit these limits. And this case is no exception – when I ran the neo4j-sail-test program in Eclipse, I got a “Java heap space” error.
Luckily, there is a fix. You need to explictly tell the program you’re using that it’s allowed to use more memory, by starting it with the argument
-Xmx[HOW_EVER_MUCH_MEMORY_YOU_WANT]m
e.g.
% java -jar -Xmx5000m unicorn_hunter.jar
With a program you run from the command line, that’s easy enough. For a program you build in Eclipse, it’s less obvious. What we need to do is edit the configuration file Eclipse uses when it starts, which is called “eclipse.ini”. Where is this file? Not in the Eclipse root directory!
Instead, it’s INSIDE THE APP

To get to it, go to the directory where you’ve installed Eclipse. For me, it’s /usr/local/eclipse.
From there, type:
% cd Eclipse.app/Contents/MacOS
Your eclipse.ini file is in here. Open it with a text editor, e.g.
% emacs eclipse.ini
and find the line that says something like -Xmx384m, and change it to the biggest number your system can handle. (For me, -Xmx5000m).
Save that file. Now…
STEP 9: RUN NEO4J-SAIL-TEST!
If you’ve followed these directions (and don’t have any other random, random problems), you should see:
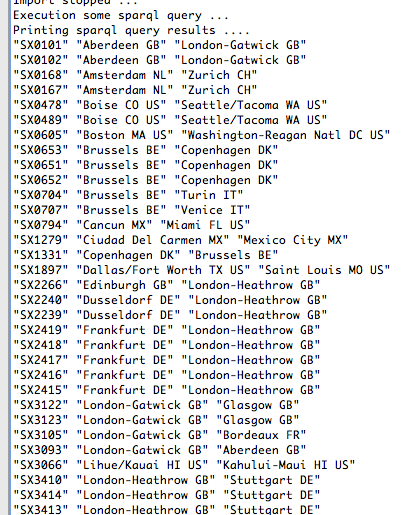
Congratulations! You’ve just used Neo4j and Tinkerpop to execute a SPARQL query!
My plan from here is to use the neo4j-sail-test project and tweak the code to do what I personally need.
Let’s see how that goes…
Hope you’ve enjoyed this intro, that it works for, and that it doesn’t obsolesce too quickly. If you run into any problems, leave a comment or shoot an email and I’ll see if I can help!