[Edit 7/11/2013: This method has apparently been deprecated. See http://blog.cloudera.com/blog/2013/03/how-to-create-a-cdh-cluster-on-amazon-ec2-via-cloudera-manager/ for newer methods!]
Prologue:
I’m working on a project that requires slicing and dicing about 70GB of RDF data (something like 500 million lines)[1]. That’s almost doable on a single fast machine, but it’s more than can fit in main memory of even Amazon’s largest cloud server.
I spent a while experimenting with different single-machine algorithms and data structures, tried using Postgres as a big hash table, and tried a variety of NoSQL solutions. All that experimenting made it abundantly clear that there’s only one reasonable solution – bite the bullet and move to using Hadoop for processing and HBase for storage.
As you may know, Hadoop is a tool that lets you write “MapReduce” jobs that split work across a number of different computers (“map”) and then reassemble the results (“reduce.”) HBase is a database appears that lets you store data across a number of different computers. They’re both clones of the infrastructure that powered the early Google indexing system (“MapReduce” and “BigTable” respectively), and both are in heavy industrial use at places like Facebook.
I won’t try to sell you on using them, but if you’re facing a certain class of problems these tools are a godsend. The magic is that once you’ve got them configured, you can speed up your programs (mostly) linearly by simply conscripting more computers [2]. At the moment, a “large” instance on Amazon’s cloud costs $0.32/hr, so you can make a program run 10x faster for just $3 more per hour.
The downside of Hadoop and HBase is that they are really freakin’ complicated, especially for a n00b like me who is just getting started with programming. It took me quite a long time to get a cluster up an running.
But along the way, I realized that about 90% of the complexity of these tools is either in:
Getting them configured to not explode on the launchpad
2) Performance tweaks that are only necessary for exceptionally strenuous use-cases.
The goal of this post is to help you skip that complexity and just get going as fast as possible. I’m going to walk you through a (relatively) simple set of steps that will get you running map-reduce programs on a 6-node distributed Hadoop/Hbase cluster as fast as possible.
This is all based on what I’ve picked up reading on my own; so if you know of better/faster ways to get up and running, please let me know in the comments!
Summary:
We’re going to be running our cluster on Amazon’s EC2. We’ll be launching the cluster using Apache’s “Whirr” program and configuring it using Cloudera’s “Manager” program. Then we’ll run some basic programs I’ve posted on Github that will parse data and load it into Hbase.
All together, this tutorial will take a bit over one hour and cost about $10 in server costs.
Part I: Get the cluster running.
[EDIT: A commenter pointed out to me that there is a tool to launch the control node AND the cluster at the same time in one go. You can find it here: https://github.com/tomwhite/whirr-cm). The downside is that it only runs CentOS instead of Ubuntu, but that’s probably worth it to let you skip to Part III.]
Part I(a): Set up EC2 Command Line Tools
I’m going to assume you already have an Amazon Web Services account (because it’s awesome, and the basic tier is free.) If you don’t, go get one. Amazon’s directions for getting started are pretty clear, or you can easily find a guide with Google. We won’t actually be interacting with the Amazon management console much, but you will need two pieces of information, your AWS Access Key ID and your AWS Secret Access Key.
To find these, go to https://portal.aws.amazon.com/gp/aws/securityCredentials. I won’t show you a screen shot of my page for obvious reasons :). You can write these down, or better yet add them to your shell startup script by doing
$ echo "export AWS_ACCESS_KEY_ID=<your_key_here>" > ~/.bashrc
$ echo "export AWS_SECRET_ACCESS_KEY=<your_key_here>" > ~/.bashrc
$ exec $SHELL
You will also need a security certificate and private key that will let you use the command line tools to interact with AWS. From the AWS Management Console go to Account (top left) then “Security Credentials” and in “Access Credentials” select the “X.509 Certificates” tab and click on “Create a new Certificate”. Download and save this somewhere safe (e.g. ~/.ec2)
Then do
 $ export EC2_PRIVATE_KEY=~/.ec2/<your_key>.pem
 $ export EC2_CERT=~/.ssh/<your_key>.pem
Finally, you’ll need a different key to log into your servers using SSH. To create that, do
 $ mkdir ~/.ec2
 $ ec2-add-keypair --region us-east-1 hadoop | sed 1d > ~/.ec2/hadoop
 $ chmod 600 ~/.ec2/hadoop
 (to lock down the permissions on the key so that SSH will agree to use it.)
Part I(b): Make your Whirr control node
The computers that make up a cluster are called “nodes”, and you have the option of creating of manually creating a bunch of EC2 nodes[3], but that’s a pain.
Instead, we’re going to use an Apache Tool called “Whirr,” which is specifically designed to allow push-button setup of clusters in the cloud.
To use Whirr, we are going to need to create one node manually, which we are going to use as our “control center.” I’m assuming you have the EC2 command-line tools installed (if not, go here and follow directions.)
We’re going to create an instance running Ubuntu 10.04 (it’s old, but all of the tools we need run stably on it), and launch it in the USA-East region. You can find AMI’s for other Ubuntu versions and regions here (http://alestic.com/)
So, do…
$ ec2-run-instances ami-1db20274 -k "hadoop"This creates an EC2 instance using a minimal Ubuntu image, with the SSH key “hadoop_tutorial” that we created a moment ago. The command will produce a bunch of information about your instance. Look for the “instance id” that starts with “i-”

then do:
$ ec2-describe-instance [i-whatever]
This will tell you the IP of your new instance (it will start ec2-) Now we’re going to remotely log in to that server.
$ ssh -i ~/.ec2/hadoop ubuntu@ec2-54-242-56-86.compute-1.amazonaws.comNow we’re in! This server is only going to run two programs, Whirr and the Cloudera Manager. First we’ll install Whirr. Find a mirror at (http://www.apache.org/dyn/closer.cgi/whirr/), then download to your home directory using wget:
$ wget http://www.motorlogy.com/apache/whirr/whirr-0.8.0/whirr-0.8.0.tar.gzUntar and unzip:
$ tar -xvf whirr-0.8.0.tar.gz
$ cd whirr-0.8.0
Whirr will launch clusters for you in EC2 according to a “properties” file you pass it. It’s actually quite powerful and allows a lot of customization (and can be used with non-Amazon cloud providers) or allows you to set up complicated servers using Chef scripts. But for our purposes, we’ll keep it simple.
Create a file called hadoop.properties:
$ nano hadoop.propertiesAnd give it these contents:
“”“
whirr.cluster-name=whirrly
whirr.instance-templates=6 noop
whirr.provider=aws-ec2
whirr.identity=<YOUR AWS ACCESS KEY ID>
whirr.credential=<YOUR AWS SECRET ACCESS KEY >
whirr.cluster-user=huser
whirr.private-key-file=${sys:user.home}/.ssh/id_rsa
whirr.public-key-file=${sys:user.home}/.ssh/id_rsa.pub
whirr.env.repo=cdh4
whirr.hardware-id=m1.large
whirr.image-id=us-east-1/ami-1db20274
whirr.location-id=us-east-1
”“’
This will launch a cluster of 6 unconfigured "large” EC2 instances.[4][5]
Before we can use Whirr, we’re going to need to install Java, so do:
$ sudo apt-get update
$ sudo apt-get install openjdk-6-jre-headless
Next we need to create that SSH key that will let our control node log into to our cluster.
$ ssh-keygen -t rsa -P ''
And hit [enter] at the prompt.
Now we’re ready to launch!
$ bin/whirr launch-cluster --config hadoop.propertiesThis will produce a bunch of output and end with commands to SSH into your servers.

We’re going to need these IP’s for the next step, so copy and paste these lines into a new file:
$ nano hosts.txtThen use this bit of regular expression magic to create a file with just the IP’s:
$ sed -rn "|.*@(.*)'| s/.*@(.*)'/1/p" hosts.txt >> ips.txtPart II: Configure the Cluster
Cloudera is a company that (among other things) focuses on making Hadoop easier to use, and they’ve released two very helpful products that do just that. The first is the “Cloudera Distribution of Hadoop” (a.k.a. CDH) that puts all the hadoop/hbase code you need in one convenient package. The second is the Cloudera Manager, which will automatically install and configure CDH on your cluster. And it’s free for the first 50 nodes.
From your Control Node, download the manager:
$ wget http://archive.cloudera.com/cm4/installer/latest/cloudera-manager-installer.binThen install it:
$ sudo chmod +x cloudera-manager-installer.bin $ sudo ./cloudera-manager-installer.binThis will pop up an extreme green install wizard, just hit yes to everything.
Somewhat frustratingly for a tool that will only run on Linux, Cloudera Manager is entirely web-based and works poorly with textual browsers like Lynx. Luckily, we can access the web interface from our laptop by looking up the public DNS address we used to log in to our control node, and appending “:7180” to the end in our web browser.
First, you need to tell Amazon to open that port. The manager also needs a pretty ridiculously long list of open ports to work, so we’re just going to tell Amazon to open all TCP ports to nodes that are within the security group that Whirr sets up automatically, and then open the port for the Admin console to the whole internet (since it’s password protected anyway.) That’s not perfect for security, so you can add the individual ports if you care enough (lists here):
$ ec2-authorize default -P tcp -p 0-65535 -o "jclouds#whirrly"
$ ec2-authorize default -P tcp -p 7180 -o 0.0.0.0/0
$ ec2-authorize default -P udp -p 0-65535 -o "jclouds#whirrly"$ ec2-authorize default -P icmp -t -1:-1 -o "jclouds#whirrly"Then fire up Chrome and visit http://ec2-<WHATEVER>.compute-1.amazonaws.com:7180/
Log in with the default credentials user: “admin” pass: “admin”
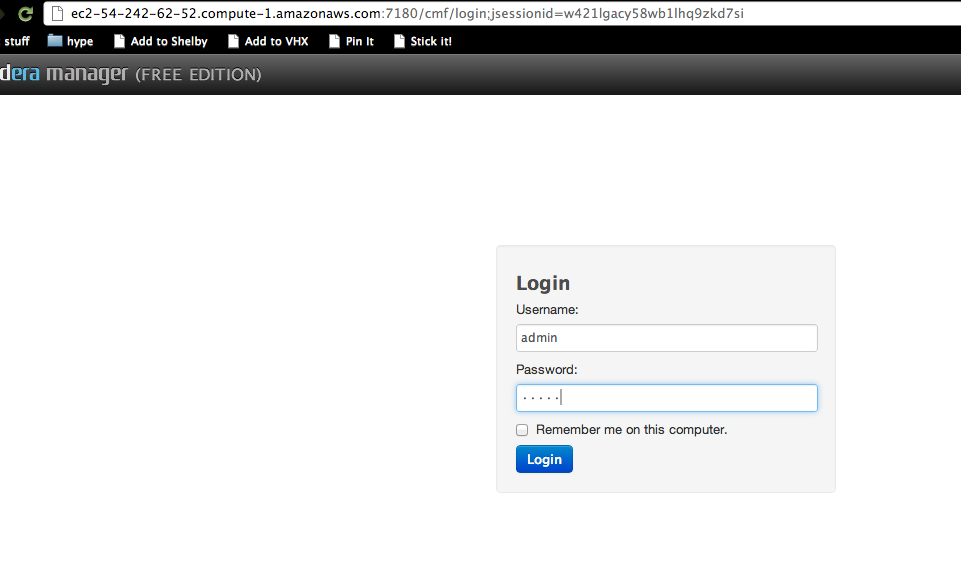
Click “just install the free edition”, “continue”, then “proceed” in tiny text at the bottom right of the registration screen.
Now go back to that ips.txt file we created in the last part and copy the list of IP’s. Past them into the box on the next screen, and click “search”, then “install CDH on selected hosts.”
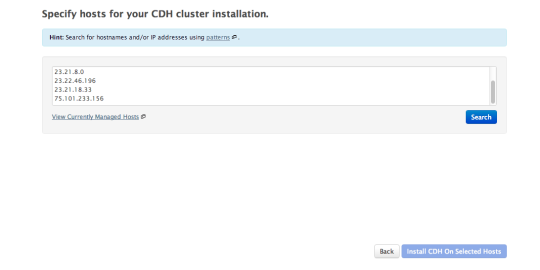
Next the manager needs credentials that’ll allow it to log into the nodes in the cluster to set them up. You need to give it a SSH key, but that key is on the server and can’t be directly accessed from you laptop. So you need to copy it to your laptop.
$ scp -r -i ~/.ec2/hadoop_tutorial.pem ubuntu@ec2-54-242-62-52.compute-1.amazonaws.com:/home/ubuntu/.ssh ~/Downloads/hadoop_tutorial(“scp” is a program that securely copies files through ssh, and the -r flag will copy a directory.)
Now you can give the manager the username “huser”, and the SSH keys you just downloaded:
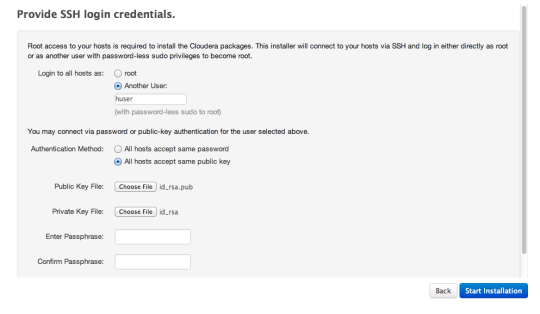
Click “start installation,” then “ok” to log in with no passphrase. Now wait for a while as CDH is installed on each node.
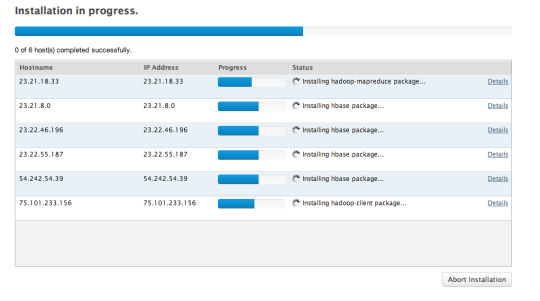
Next the manager will inspect the hosts and hit some warnings but just click continue.
Then the manager will ask you which services you want to start – choose “custom” and then select Zookeeper, HDFS, HBase, and MapReduce.
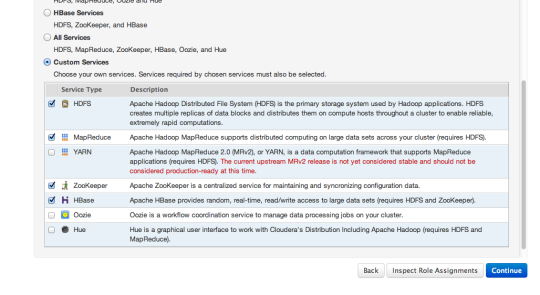
Click continue on the “review configuration changes” page, then wait as the manager starts your services.
Click continue a couple more times when prompted, and now you’ve got a functioning cluster.
Part III: Do something with your cluster.
To use your cluster, you need to SSH login to one of the nodes. Pop open the “hosts.txt” file we made earlier, grab any of the lines, and paste it into the terminal.
$ ssh -i /home/ubuntu/.ssh/id_rsa -o "UserKnownHostsFile /dev/null" -o StrictHostKeyChecking=no huser@75.101.233.156If you already know how to use Hadoop and HBase, then you’re all done. Your cluster is good to go. If you don’t, here’s a brief overview.
“Hadoop” is an umbrella term for a set of services that allow you to run parallel computations. The actual workhorses are the Hadoop Distributed File System (HDFS, an actual UNIX-like file system), “MapReduce” (the framework that actually farms out programs to the nodes), and “ZooKeeper” (a routing service that keeps track of what’s actually running/stored on each node and routes work accordingly.)
The basic Hadoop workflow is to run a “job” that reads some data from HDFS, “maps” some function onto that data to process it, “reduces” the results back to a single set of data, and then stores the results back to HDFS. You can also use HBase as the input and/or output to your job.
You can interact with HDFS directly from the terminal through commands starting “hadoop fs”. In CDH, you need to be logged in as the “hdfs” user to manipulate HDFS, so let’s log in as hdfs, create a users directory for ourselves, then create an input directory to store data.
 $ sudo su - hdfs
 $ hadoop fs -mkdir -p /user/hdfs/input
You can list the contents of HDFS by typing:
$ hadoop fs -ls -R /userTo run a program using MapReduce, you have two options. You can either:
Write a program in Java using the MapReduce API and package it as a JAR
2) Use “Hadoop Streaming”, which allows you to write your “mapper” and “reducer” scripts in whatever language you want and transmit data between stages by reading/writing to StdOut.
If you’re used to scripting languages like Python or Ruby and just want to crank through some data, Hadoop Streaming is great (especially since you can add more nodes to overcome the relative CPU slowness of a higher level language.) But interacting programmatically with HBase is a lot easier through Java[6]. So I’ll provide a quick example of Hadoop streaming and then a more extended HBase example using Java.
Now, grab my example code repo off Github. We’ll need git.
(If you’re still logged in as hdfs, do “exit” back to “huser” since hdfs doesn’t have sudo privileges by default)
 $ sudo apt-get install -y git-core
 $ sudo su - hdfs
 $ git clone https://github.com/rogueleaderr/Hadoop_Tutorial.git $ cd Hadoop_Tutorial/hadoop_tutorial
For some reason, Cloudera Manager does not see fit to tell the nodes where to find the configuration files it needs to run (i.e. “set the classpath”), so let’s do that now:
$ export HADOOP_CLASSPATH=/etc/hbase/conf.cloudera.hbase1/:/etc/hadoop/conf.cloudera.mapreduce1/:/etc/hadoop/conf.cloudera.hdfs1/Part III(a): Hadoop Streaming
Michael Noll has a good tutorial on Hadoop streaming with Python here. I’ve stolen the code and put it in Github for you, so to get going:
Load some sample data into hdfs:
$ hadoop fs -copyFromLocal data/sample_rdf.nt input/sample_rdf.nt
$ hadoop fs -ls -R
(to see that the data was copied)
Now let’s hadoop:
$ hadoop jar /usr/lib/hadoop-0.20-mapreduce/contrib/streaming/hadoop-streaming-2.0.0-mr1-cdh4.0.1.jar -file python/mapper.py -mapper python/mapper.py -file python/reducer.py -reducer python/reducer.py -input /user/hdfs/input/sample_rdf.nt -output /user/hdfs/output/1That’s a big honking statement, but what it’s doing is telling hadoop (which Cloudera installs in /usr/lib/hadoop-0.20-mapreduce) to execute the “streaming” jar, to use the mapper and reducer “mapper.py” and “reducer.py”, passing those actual script files along to all of the nodes, telling it to operate on the sample_rdf.nt file, and to store the output in the (automatically created) output/1/ folder.
Let that run for a few minutes, then confirm that it worked by looking at the data:
$ hadoop fs -cat /user/hdfs/output/1/part-00000That’s hadoop streaming in a nutshell. You can execute whatever code you want for your mappers/reducers (e.g. Ruby or even shell commands like “cat”.)[7]
Part III(b): The Hadoop/Hbase API
If you want to program directly into Hadoop and HBase, you’ll do that using Java. The necessary Java code can be pretty intimidating and verbose, but it’s fairly straightforward once you get the hang of it.
The github repo we downloaded in Part III(a) contains some example code that should just run if you’ve followed this guide carefully, and you can incrementally modify that code for your own purpose[8].
All you need to run the code is Maven[9]. Grab that:
(if you’re logged in as user “hdfs”, type “exit” until you get back to huser. Or give hdfs sudo privileges with “visudo” if you know how.)
$ sudo apt-get install maven2
$ sudo su - hdfs $ cd Hadoop_Tutorial/hadoop_tutorial
When you run hadoop jobs from the command line, Hadoop is literally shipping your code over the wire to each of the nodes to be run locally. So you need to wrap your code up into a JAR file that contains your code and all the dependencies[10].
Build the jar file by typing:
 $ export JAVA_HOME=/usr/lib/jvm/j2sdk1.6-oracle/
 (to tell maven where java lives, since Cloudera also inexplicably doesn’t do it for you.)
 $ mvn package
That will take an irritatingly long time (possibly 20+ minutes) as Maven downloads all the dependencies, but it requires no supervision.
(If you’re curious, you can look at the code with a text editor at /home/users/hdfs/Hadoop_Tutorial/hadoop_tutorial/src/main/java/com/tumblr/rogueleaderr/hadoop_tutorial/HBaseMapReduceExample.java). There’s a lot going on, but I’ve tried to make it clearer with comments.
Now we can actually run our job.
$  cd /var/lib/hdfs/Hadoop_Tutorial/hadoop_tutorial
$ hadoop jar target/uber-hadoop_tutorial-0.0.1-SNAPSHOT.jar com.tumblr.rogueleaderr.hadoop_tutorial.HBaseMapReduceExample
If you get a bunch of connection errors, make sure your classpath is set correctly by doing:$ export HADOOP_CLASSPATH=/etc/hbase/conf.cloudera.hbase1/:/etc/hadoop/conf.cloudera.mapreduce1/:/etc/hadoop/conf.cloudera.hdfs1/Confirm that it worked by opening up the hbase commandline shell:
$ hbase shell
hbase(main):001:0> scan "parsed_lines"
If you see a whole bunch of lines of data, then…congratulations! You’ve just parsed RDF data using a 6-node Hadoop Cluster, and stored the results in HBase!
Part IV: Next Steps
Believe it or not, you’re passed the hardest part. In my opinion, the conceptual difficulty of understanding (at the least basics) or how to use Hadoop and HBase pales in comparison to the difficulty of figuring out how to set them up from scratch.
But it’s still not trivial. To use Hadoop, you need to understand the Map-Reduce programming paradigm to make sure that you’re actually taking advantage of the power of parallel computing. And you need to understand the HBase data model to use it (on the surface, it’s actually quite similar to MongoDB.)
And if you want real performance out of your setup, you will eventually need to understand all the complicated configuration options I’ve glossed over.
All that’s a tall order, and beyond the scope of this guide. But here are some resources that should help:
If you’re planning on doing serious work with Hadoop and HBase, just buy the books:
“Hadoop, the Definitive Guide”
(Don’t worry, I’m not getting affiliate revenue.)
The official tutorials for Whirr, Hadoop, and HBase are okay, but pretty intimidating for beginners.
Beyond that, you should be able to Google your way to some good tutorials. If I get time, I’ll try to write a post in the future with more information about what you can actually do with Hadoop and Hbase.
I hope you’ve enjoyed this article. For more, follow me on Twitter! And if you’re curious about my project and potentially interested in helping, drop me a line at george (DOT) j (DOT) london at gmail.
(As I mentioned above, these are the learnings of a n00b and there are probably better ways to do most of this. Please post in the comments if you have suggestions! Also, I can’t figure out how to let the Cloudera Manager access the logs or Web UI’s on the nodes, so please let me know if you can figure that out.)
Footnotes:
[1] Resource Description Framework, used for publishing data in an easy-to-recombine format.
[2] The speedup is only really linear if your program is CPU-constrained and parallelizable-in-principle. If you’re I/O bound, parallelization can still help but it requires more intelligent program design.
[3] Elastic Compute Cloud is Amazon’s service that lets you create virtual servers (a.k.a. “instances”.) They also provide a number of other services, but EC2 is the big one.
[4] For some reason, Whirr refuses to create small or medium instances, which is frustrating because large’s are overkill for some tasks. Please let me know if you know how to launch smaller instances.
[5] As I painfully learned, the trick to making Whirr work with the Cloudera Manager is to create un-configured “NO-OP” instances and let the manager handle all the configuration. If you use Whirr’s “hadoop” recipes, the configurations will clash and the manager won’t work.
[6] Interacting with HBase is tricky but not impossible with Python. There is a package called “Happybase” which lets you interact “pythonically” with Hbase. The problem is that you have to run a special server called “Thrift” on each server to translate the Python instructions into Java, or else transmit all of your requests over the wire to a server on one node, which I assume will heavily degrade performance. Cloudera will not set up Thrift for you, though you could do it by hand or using Whirr+Chef.
[7] If you want to use non-standardlib Python packages (e.g. “rdflib” for actually parsing the RDF.), you need to zip the packages (using “pip zip [package]”) and pass those files to hadoop streaming using “-file [package.zip].”
[8] The basic code is adapted from the code examples in O’Reilly “HBase, the Definitive Guide.” The full original code can be found on github here (github.com/larsgeorge/hbase-book). That code has its own license, but my marginal changes are released into the public domain.
[9] A Java package manager, which makes sure you have the all the libraries your code depends on. You don’t need to know how it works for this example, but if you want to learn you can check out my post here, which is partially an introduction to Maven.
[10] There are other ways to bundle or transmit your code, but I think fully self-contained “fat jars” are the easiest. You can make these using the “shade” plugin which is already included in the example project.
(edit: fixed code formatting)